User Provisioning with WSO2 Identity Server

If you consider a scenario like joining an organization or open a new bank account, your identity is represented by a digital identity which is usually known as a user account. It can be a self-registered one or an account created by an administrator depending on the scenario. The organization can maintain these accounts with their systems and users can have different level of access to resources and services depending on the privileges assigned to that particular account. User provisioning allows to automate this task by providing improved security and seamless integration while saving time and money.
Provisioning is the process of creating, maintaining, and deleting digital identities (accounts) for users of a system(s) and linking appropriate rights to identities in the form of rules and roles.
This blog explores following standard user provisioning methods along with hands-on exercises using WSO2 Identity Server.
- Inbound Provisioning
- Outbound Provisioning
- JIT Provisioning
Inbound Provisioning
Inbound provisioning refers to provisioning users or groups in to the WSO2 Identity Server by an external application, which are known as service providers. WSO2 Identity Server supports the SCIM API and SOAP-based Web service API standards for inbound provisioning.
Following is a quick guide to demonstrate inbound provisioning using SCIM2.
- Download WSO2 Identity Server 5.11.0 from here and run it by executing
wso2server.sh(For unix environment) orwso2server.bat(For windows environment) file from the<IS_HOME>/bindirectory. - Use following curl command to provision user into the Identity Server.
curl -v -k --user admin:admin --data '{"schemas":[],"name":{"familyName":"N","givenName":"Rashmini"},"userName":"rashmini","password":"abc123","emails":[{"primary":true,"value":"rash@gmail.com","type":"home"}]}' --header "Content-Type:application/json" https://localhost:9443/scim2/Users- View the provisioned user using the below command. (user-id can be obtained from the response you get for the above request)
curl -v -k --user admin:admin 'https://localhost:9443/scim2/Users/<user-id>'- Update the provisioned user information.
curl -v -k --user admin:admin -X PUT -d '{"schemas":[],"name":{"familyName":"N","givenName":"Rashmini"},"userName":"rashmini","emails":[{"value":"rashmini@gmail.com","type":"home"}]}' --header "Content-Type:application/json" https://localhost:9443/scim2/Users/<user-id>- Delete the provisioned user.
curl -v -k --user admin:admin -X DELETE https://localhost:9443/scim2/Users/<user-id> -H "Accept:application/scim+json"Outbound Provisioning
Outbound provisioning provisions users to a trusted identity provider from the WSO2 Identity Server. This trusted identity provider can be Google, Salesforce or any other identity provider that supports inbound provisioning. Outbound provisioning is supported via SCIM or SPML standards.
Let’s look at how to perform outbound provisioning in WSO2 Identity Server to provision users to another identity server using SCIM. Let’s consider the identity server which configures outbound provisioning as IS1 and the identity server to which users are provisioned as IS2.

Since we are using two identity server instances at the same time, one instance should be run on a different port (default port is 9443). Following are the configurations to change the port to 9444 in IS2.
Open the deployment.toml file in <IS_HOME>/repository/conf directory.
Add offset=1 to the server section.
Start the IS2 instance by executing wso2server.sh (Unix) or wso2server.bat (Windows)
There are 3 major steps to be followed to configure outbound provisioning.
- Configure an identity provider
- Log into the management console of IS1 via https://localhost:9443/carbon/
- In the
Maintab, underIdentitymenu, click onAddunderIdentity Providers. - Enter a unique name for the identity provider name.
- Expand the
Outbound Provisioning Connectorssection and then expand theSCIM Provisioning Configurationsection. - Enter the following values and click
Register.
Tick Enable Connector
Username: username of the SCIM application (since we have used an identity server instance, a username of a user registered in is2 is used, eg: admin)
Password: password associated with the above username
User Endpoint: https://localhost:9444/wso2/scim/Users
Group Endpoint: https://localhost:9444/wso2/scim/Groups
Userstore Domain: PRIMARY
Keep Enable Password Provisioning ticked.
2. Configure the resident service provider
When configuring outbound provisioning through the management console, outbound provisioning identity provider must be configured against the resident service provider.
- Log into the management console of IS1.
- In the
Maintab, underIdentitymenu, click onResidentunderService Providers. - Expand the
Outbound Provisioning Configurationsection. - Select the identity provider you added in above step and click on the
+button. - Click
Update.
3. Test outbound provisioning
- Log into the management console of IS1.
- In the
Maintab, underIdentitymenu, click onAddunderUsers and Roles. Click onAdd New User. Enter username and password and clickFinish. - Log into the management console of IS2.
- In the
Maintab, underIdentitymenu, click onListunderUsers and Roles. Click onUsers. - You will find that the user added to IS1 has been added to IS2 as well.
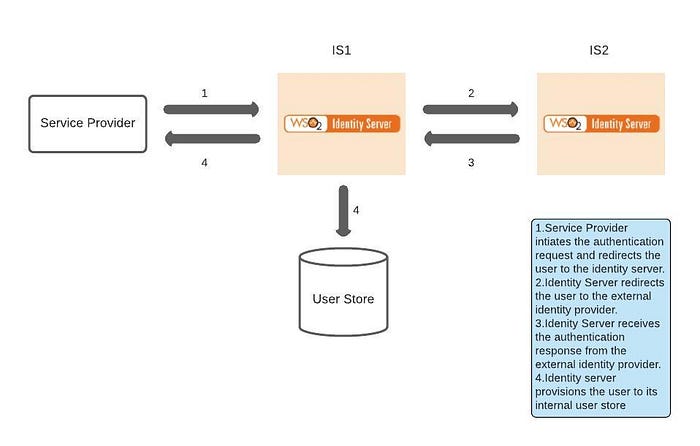
JIT Provisioning
Just-In-Time provisioning provisions users to the Identity Server at the time of federated authentication. It is triggered when the Identity Server receives a positive authentication response from the external Identity Provider. The Identity Server provisions the user to its internal user store using the user claims of the authentication response.
Let’s consider two identity server instances as before, WSO2 Identity Server which provides JIT Provisioning as IS1 and the WSO2 Identity Server acting as the identity provider as IS2.
JIT Provisioning configurations can be explained under 4 major steps.
- Configure a service provider on IS2
- Log into the management console of IS2.
- In the
Maintab, underIdentitymenu, click onAddunderService Providers. Add a unique name for the service provider and clickRegister. - Expand the
Inbound Authentication Configurationsection and then expand theOAuth/OpenID Connect Configurationsection and clickConfigure. - For
Callback Url, add https://localhost:9443/commonauth and click onAdd. OAuth Client Keyand theOAuth Client Secretwill be needed for upcoming steps.- Click
Update.
2. Configure IS2 as an identity provider with JIT provisioning in IS1
- Log into the management console of IS1.
- In the
Maintab, underIdentitymenu, click onAddunderIdentity Providers. Add a unique name for the service provider. - Expand the
Federated Authenticatorssection and then expand theOAuth/OpenIDConnect Configurationsection and enter the following values.
Tick Enable OAuth2/OpenIDConnect
Client Id: obtained from above step
Client Secret: obtained from above step
Authorization Endpoint URL: https://localhost:9444/oauth2/authorize
Token Endpoint URL: https://localhost:9444/oauth2/token
Callback URL: https://localhost:9443/commonauth- Expand the
Just-In-Time Provisioningsection and selectAlways provision to User Store Domain. SelectPRIMARYin drop-down (to provision users to the primary store) and selectProvision silently(to complete provisioning process without prompting for extra details). This configuration can be changed depending on your requirement. - Click
Register.
3. Configure a service provider in IS1 to federate authentication to IS2
You can use the sample app playground2 for this exercise (or you can use your own app). Deploy it in Tomcat.
- Log into the management console of IS1.
- In the
Maintab, underIdentitymenu, click onAddunderService Providers. Add a unique name for the service provider and clickRegister. - Expand the
Inbound Authentication Configurationsection and then expand theOAuth/OpenID Connect Configurationsection and clickConfigure. - For
Callback Url, add http://localhost:8080/playground2/oauth2client and click onAdd. OAuth Client Keyand theOAuth Client Secretwill be needed for upcoming steps.- Expand the
Local & Outbound Authentication Configurationsection and then selectFederated Authenticationand in the drop-down, select the identity provider configured before. - Click
Update.
4. Test JIT Provisioning
- Add a new user in IS2.
- Access the playground2 app via http://localhost:8080/playground2/oauth2.jsp.
- Add Client Id obtained from the service provider added in IS1 and click
Authorize. It will redirect to the login page of IS2. - Login with the credentials of the user added to IS2.
- Then, navigate to the
Userssection in management console of IS1. You will find that the user added to IS2 has been added to IS1 as well.
Hope you got a good understanding on user provisioning with WSO2 Identity Server. Thank you for reading!
References
[1] https://is.docs.wso2.com/en/latest/learn/identity-provisioning/

